

Review: ALU-DIBOND AND FOREX PRINTS FROM ZOR.
- Jul 16, 2018
- 16 min read

Upcoming August I will have a photo exhibition on a large outdoor sports orientated happening. For the event, I want to display a selection of images which would connect well with the theme. So I needed to get some new prints produced. In this review I will describe for which type of prints I went, where I got them produced, how the final results look like and how the prints on different materials compare to each other.
Deciding on the material
For the past 4 years, I got the majority of my large prints produced by Xpozer. But unfortunately, I’m not satisfied anymore with their productions. The print quality is absolutely outstanding. Coloring, dynamic range and detail in their prints are phenomenal. But the prints are very vulnerable. In the past year I have had to throw away quite many prints, due to damages which were already on the prints when I took them out of the packaging for the first time. Xpozer replaced those without any extra expenses. Yet, the replacing prints also continued to come in damaged. It is very frustrating to plan an exhibition and not being able to display all the pictures you had in mind. Therefor I wanted to go now for something less vulnerable and more solid. I decided to go for direct prints on alu-dibond and forex board.
Large prints on alu-dibond and forex board have become quite popular over the past years and many print shops offer the possibility to print on these materials. Prints on forex board are in general cheaper than prints on alu-dibond. For a 90x60cm print on alu-dibond you have to lay down about 90,- euro and for a same size print on forex board about 65 euro. As you can see, there is a rather large difference in price between the two materials. It made me wonder if the price difference is due to the quality difference between the prints or if it just comes down to the materials used. Strangely enough, I didn’t manage to find any good comparisons online. Therefore I decided to print some of my images on both materials, and compare them directly with each other.
Where to print
Now I only needed to select the right print shop for the production of the prints. Lately I have heard several good things about a Belgium company called ZOR. Several respected photographers got the chance to get a picture printed at ZOR to review. I have read several reviews and all of them are very positive regarding the quality of the prints. But there are many producers which also deliver high quality prints on these materials. The biggest difference between the prints produced by ZOR and prints produces anywhere else, must be the price. As mentioned above, for a 90x60cm print on alu-dibond and forex, you normally pay about 90 and 65 euro respectively. Yet, ZOR offers these for 34,99 and 25,99 euro respectively. And yes, this is including VAT. Their prices are about 60% lower than most of their competition.
I don’t know how they do it, but it might have to do with that ZOR does not offer any photo optimization. They print the file as how you send it. Your images don’t get checked before production. You have to prepare the images yourself before sending them. If you don’t know how to prepare an image for printing, this might be an issue. But for those of us who do know how to do this, we generally want to do this by ourselves anyway. So no extra effort and you will be sure that no-one messes up your picture after you send it in. … which has happened to me before at other print shops.
Preparing the images
For this particular exhibition I wanted to get 44 pictures printed. As you can imagine, the total price for this order was significantly lower at ZOR than at any of the competing producers. As said, I wanted to get my images printed on both alu-dibond and on forex. To prepare each picture for the printing process, I needed to resize, sharpen and to soft-proof each picture. I did this in Photoshop.
On the website of ZOR you can easily find and download the ICC profiles. For each material there is a ICC profile. So before soft proofing the images, you have to decide on which material want to print the image. Here is how I decided which picture to print on which material.
After having read several reviews about the alu-dibond and forex prints, I found out that white areas in pictures would appear to be of a different texture when printed on alu-dibond. Since the alu-dibond is white by itself, I guess that white areas in a picture, remain empty of ink and therefor appear to be of a different texture than the rest of the print. Therefore I decided to print images, which contained a lot of white, on forex plate. There was one image for which I guessed that it actually would look nice if the texture of the white would appear different than the rest of the print. This one I did print on alu-dibond.

This is the white image I decided to print on alu-dibond.
I noticed that when I loaded the alu-dibond ICC profile on pictures which contained a lot of green, the change was the largest. Meaning that images with a lot of green needed more tweaking than the other images. I checked how this compared with how the images with a lot of green looked when loading the forex ICC profile. The forex ICC profile almost didn’t change the color of these images at all. Therefore I decided to print the images which contained a lot of green, on forex instead of trying to tweak the images for alu-dibond. Except for one picture, which was quite easy to correct.

Here the difference in color during the soft proofing of the images. On the right the original image, on the top left the image with the alu-dibond ICC profile loaded and below that image with the forex ICC profile loaded.
Some of my images contain large very dark and black areas. These areas can cause some problems when printing. The flow from a non-black to a black area can be quite tricky. You want the transmission to be smooth and not to clip. During the soft proofing of these images, I noticed that the forex ICC profile kept the transmission into the black areas smooth. However, when I loaded the alu-dibond ICC profile, the black areas started clipping and showed strong boarders instead. I didn’t believe that the difference could be that big and decided to still print these images on alu-dibond. To be able to see if there would be any difference, I also got these same images printed on forex plate.

In the screenshot above you can see the clipping of the black area on the image with the alu-dibond ICC profile loaded. It is difficult to see the clipping well on the screenshot, but it is more visible in PS. The image with the forex ICC profile loaded, remains smooth.
Since a computer monitor always displays the images brighter than the actual prints, I increased the exposure by about 1/3 stop for some of the images. For most of the images I didn’t do this, since I thought they would not lose anything if they would get a little bit darker. Some images had a rather dark subject, compared with the surroundings of the subject. On the computer monitor these images look fine. But I would not like it if the subjects would get even darker. Therefore I increased the exposure of these images slightly.
Placing the order
There was only one problem. …a rather large problem. ZOR ships their prints to 21 European countries and Norway is not one of them. I contacted Jonathan at ZOR to see if there would be any chance they could ship to Norway anyway. Sadly they really cannot send the prints to Norway. The only solution would be if I would order the parcel carrier to pick up the prints at ZOR and handle the export and import process. This was not that easy to set up, so had to come up with a different solution. ZOR does ship to Sweden and I live about an hour drive from the Swedish boarder. I found someone who could receive the package and solved the problem.
Before placing an order at ZOR, you have to create an account. ZOR offers the possibility to set up a professional user account. In order to do so, you have to contact Jonathan from ZOR and he will set up the account for you. The advantage of having a pro-account is that ZOR deducts the VAT from the prices when you place your order. Once you have your account set up, it is very easy to place your order. Just choose the material you want the picture to be produced on, upload the picture, select the size of the print and add the print to your shopping cart.
Before finalizing your order, you get the possibility to change your order from a regular order to an “express” order. On the ZOR website it says that the regular orders will arrive between 7 and 10 working days. Express orders will arrive between 3-5 working days. Since I have an holiday planned and want to be sure that the prints arrive before I leave, I went for the express order. I placed the order on a Wednesday afternoon, after closing hours at ZOR. On Friday I received from Jonathan the message that they were printing the last image of the order. On Monday the prints were shipped from ZOR and on Wednesday morning (the 5th working day) they were ready to be picked up in the parcel depot in Sweden. I had to possibility to either pick up the prints in the parcel depot or have them send to an home address of someone I knew in the area. I went for the last option. The prints arrived at 12:00 on Thursday, which is on the 6th working day after my order. To be honest, I never expected to pictures to arrive that fast! If I would say that I’m impressed, that would be an understatement. I’m used to wait for 2 to 3 weeks to get my prints, if I order them abroad. Sadly they were not delivered at my home address and I had to drive quite a bit to get the prints back home. But it was an effort I was more than happy to make.
Packaging of the prints
Just as important as the print quality, is the packaging quality. The print quality doesn’t matter if the prints get damaged during transport. ZOR divided the 44 prints over 5 packages. Each group of prints is packed in a sturdy cardboard box. The boxes got quite dented and some even had some holes in them. I’m sure the boxes didn’t look like this when they left ZOR. And am happy to see that they know at ZOR that the parcel carriers can rough up the packages and that they pack the prints accordingly. When opening the cardboard boxes, there is plenty of space around the prints, protecting the prints from getting dented from the sides. Each corner of a bundle of prints, is protected with a foam corner.


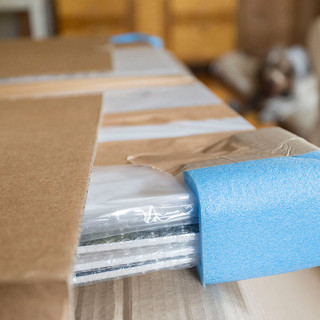
The packaging
In four out of the five packages, the corners are taped on to the bundle of prints. In one package the corners were not taped into place and came off during transport. This caused the prints to turn about 45 degrees in the package and bounce with the corners into the package. I checked the prints and two forex prints got slightly damaged. Both of them have a dent in the side and one of them has now a round corner. By Murphy’s law, these were exactly two of my best sold pictures. Luckily there were also alu-dibond prints in the box, which probably protected the forex prints from getting more damaged than they were now. Hopefully ZOR will always tape the foam corners from now on, because these definitely protect the prints and keep them in place inside the box.


The package where the foam corners came off. As you can see from the dents in the cardboard box, the prints slammed several times with the corner into the box. As result, one of the corners got damaged and two other prints have a dent on the side.
Each print is wrapped in plastic. Most of the prints are wrapped in bubble wrap, but some of the smaller prints (60x40cm) are wrapped in plastic sheet. Both the bubble wrap as the sheet protect the images well. But the tape with which the plastic is tapes shut, tears apart the plastic sheet when opening the prints. The bubble wrap stays unharmed when removing the tape. Since these prints have to be re-packed after the exhibition or when I sell them, it is for me important to be able to re-pack the images again afterwards. With the bubble wrap works fine. But with the plastic sheet this will be difficult. For most people this probably won’t be a problem, since you won’t be re-packing your prints after you received your order. So nothing to worry about for most of you.
Print quality
Once I had the packages at home, I couldn’t wait with opening up the first box and unwrapping the first prints. The first print which appeared was just by chance one of my personal favorites. A picture of a herd of wild reindeer crossing a mountain river, printed on alu-dibond. My first impression was that the colors are spot on, the highlights and the darks look perfect with a lot of detail in them and the reindeer and splashing water are sharp. The second picture I unwrapped is of a male capercaillie in the snow with several females around him (female capercaillie that is of course), printed on forex board. The color came out as it should be and the snow is perfect white. The male capercaillie is a deep black bird, but has a lot of small details in the feathers. This could be tricky to print, if the print would turn out too dark. But it came out perfectly. I’m really impressed with the detail in the print and how well the details in the darks and highlights are still present. Because of the price difference I had a lower expectation of the forex prints, but this seems unjustified. The third print I opened…. Just kidding, I won’t discuss all of the prints, don’t worry! After having looked at the prints, it is clear that the quality is consistent on both materials. I didn’t find anything strange or wrong with them.
As mentioned above, the soft proofing of the images with large black areas for an alu-dibond print, showed clipping of the black areas. I’m happy to see that the actual prints did not clip, as I expected. The transmission into the black areas are as smooth as they can be. This goes for both materials.
Some of the forex boards have a tiny dent in them. Something I don’t find shocking, considering the hardness of the material. They are hardly noticeable and only occur by exception. On one of the forex prints, the printer head seems to have made a very narrow scratch. This is something I have seen too on several prints which I got produced at different print shops. Some print shops seem to have this problem more frequent than others. Judging from my order, it seems that is accurse much less on the prints of ZOR than at the other prints shops. The scratch is only visible when inspecting the print from close up. Once mounted on the wall, you won’t notice it. So no biggy. Another two forex print have a line over the full length of the print. Both on the same location. I don’t know where in the developing process these lines were created. I guess during the cutting of the pints, but I can’t say for sure. When the light hits these images in the right way, the lines are visible on a longer distance. So I guess I have to get these re-printed.


Forex prints. One with a small dent, one with a thin scratch from the printer head (I assume) and one with a line over the full length.
As others already pointed out before me, white areas on the alu-dibond prints appear to be from a different texture than the other rest of the print. So this came as no surprise to me. And as I had hoped for, the white print which I did print on alu-dibond came out very well. The difference in texture adds to the picture and almost gives a 3rd dimension to it. I tried to capture the different structure with a picture, but didn't manage to get it across well. So sadly can't show you how the final result really differs from the other prints. I’m definitely happy that I printed the other white images on forex board, because they would not have looked that nice as they do now.
Almost just as important as the printing quality, is the quality of the cut. The edges should look sharp, straight and not cut into the print. All the prints on both materials are cut absolutely perfectly. I read a review where the photographer was not satisfied with the cut of the forex board. Maybe he was unlucky or ZOR has addressed this issue. Because my prints are cut as smooth as they could be. On the backside of the alu-dibond is a plastic foil attached, which on some prints is sticking out to the sides. This is no problem, since you have to remove the foil before mounting the prints. No need to stress about that.
Comparing alu-dibond with forex
And now the answer on the big question I had before ordering. Is the quality of the prints on alu-dibond superior to the ones on forex board? Apart from that alu-dibond is a more sturdy and solid material, I don’t see any difference in quality. The prints on both materials show a stunning overall detail in the prints, lot of detail in the dark areas and highlights, the sharpness of the prints is equal and both prints display beautiful colors.
I like my prints to be as matte as possible. The less reflection, the better. It is hard to say which material is more matte than the other. There seems to be some variation on both materials. In contrast to the forex prints, on the alu-dibond prints the white areas are definitely not matte. But on the other hand, the dark areas on the forex prints seem to reflect more light than on the alu-dibond prints. I would not describe the prints as glossy, but I would also not call them completely matte. If I would have to rate how matte the prints are, with a number between 1 (for glossy) and 10 (for matte), I would give them a 7 for both materials. I guess it is not possible to have an even more matte print on these two materials, than ZOR managed to produce. For a true matte print, you would need to go for a different material, like Xpozer or paper.
The only difference in the prints, is that the colors in the prints on forex board are more true to the digital files on some of the prints. This is not a surprise, since this already showed during the soft proofing of the images. I didn’t tweak a single image for the prints on forex, but did have to tweak some of the images for the alu-dibond prints. I did my best to get the images back as close to how I intended the images to look like. Of course I didn’t succeed 100% in this, but definitely got close enough to be more that satisfied with the results. No one will ever know that the digital file looked o so slightly different.
To show the difference in color of the prints, I printed the exact same file on both materials. When I put the images on top of each other, it becomes clear that the print on forex board is warmer and kept the orange tints better. On the alu-dibond print a slight hint of green appeared in some areas. During the soft-proofing I already noticed that pictures with green were most affected. The print confirms this. When comparing the area with a lot of purple and red tones, there is no prominent difference in color visible. The print on alu-dibond appears to be slightly darker, which is barely noticeable when looking at the prints separately.


The differences between two exact same images, printed on forex and alu-dibond.
When not looking at printing quality but solely at the two materials, the alu-dibond definitely is the more sturdy and less vulnerable material. The only prints which have some kind of damage to them, are the forex board ones. Also none of the alu-dibond prints had any scratches from the printer head or other sources on them. These only occurred on the forex board prints.
Comparing the ZOR prints with Xpozer
The obvious difference between the ZOR and Xpozer prints, is the sturdiness of the material. The HD foil used by Xpozer is very vulnerable and is easily damaged. But purely looking at the print quality, you can see that the Xpozer foil is a material which is perfect for printing. The amount of detail in these prints, can simply not be matched by printing directly on alu-dibond or forex board. This doesn’t mean that the prints by ZOR are bad. Absolutely not. The prints are all very sharp and contain a lot of detail. Especially when you are looking at the prints on the distance you should be looking at the prints, the detail in the prints is stunning. Just when you crawl up close to the prints, you will see how much more detail the Xpozer prints contain.
The amount of time needed to get the print out of the packaging, get it ready to mount to the wall and sign it, is significantly lower for the forex and alu-dibond prints. It always takes a lot of time to get the Xpozers ready.
Mounting system
ZOR only offers one possibility for mounting the prints. These are Velcro sticky strips which you can order with each print in packages of 4 strips. I decided to not order these with the prints, since I can order them much cheaper in larger quantity online. My personal favorite way to mount an alu-dibond or forex board print, is with a alu rails on the backside of the print. The picture will stand out about 1cm from the wall, which adds a lot to the presentation. Hopefully ZOR will add this mounting possibility to their options.
Conclusion
If you were doubting if ZOR could actually produce high quality prints for such a cheap price, then doubt no longer. They produce absolutely stunning prints of top notch quality. The coloring, overall detail, detail in blacks and highlights, sharpness and matte finish make each print a joy to look at. Every print came out as I hoped / thought it would, which is very important. You really get what you send in.
Regarding the materials. The printing quality on both materials is superb. If you want to save some money but still want to have a high quality print, you can trust that your prints will look amazing on forex board. But be aware that this material is more vulnerable. I had the following damages on the forex prints;
-Some of the prints had a small dent in them. (exceptional)
-Two of the prints got slightly damaged during transport.
-One had a small scratch from the printer head.
-Two have a line over the full length of the print.
Please note that I experienced these damages on a total of 31 forex prints. The majority of the prints are in absolute mint condition. I have also already been in contact with Jonathan from ZOR and he has let me know that they will replace the damaged prints. Great service!
If you want to play it safe, spent a bit more money and go for the alu-dibond prints. All 13 prints I received were in absolutely mint condition. The only reason why I would go for forex instead of alu-dibond, is when the picture contains a lot of white. If you don’t want the white to turn out shiny and of a different texture, I wouldn’t print it on alu-dibond. But in some cases it actually adds to the picture. It is something you have to think about beforehand.
Will I use ZOR again for producing my prints? No doubt about it!
I want to add that I decided myself to write this review. ZOR did not ask me to do so and also didn't give me a special price on the order. This review is written from a neutral perspective. If you are still not sure, just get an image or two printed at www.zor.com and find out for yourself how the quality is like. For their price it definitely won't heard your wallet.
Pros and cons
Pro
-Easy to order
-Fast production
-Fast shipping
-Well packaged (except for one box)
-High quality prints (on both materials)
-Well cut
-The price
Cons
-Does not ship to Norway!
-Some prints in one box got damaged during transport
Great review! Your comparison between Alu-Dibond and Forex prints is clear and helpful for anyone deciding between durability and affordability. The visuals you included really highlight the differences. It’s impressive how presentation impacts perception—just like how artwork or products feel more premium when delivered in custom designed boxes.
Panduan daftar kabar4d
Hii great reading your blog